XCScore Software: Real-Time Cross Country Team Scoring
Cross country meets move fast and so should your scoring. With XCScore, FinishLynx brings team scoring to the course in real-time. Whether it’s a small invitational or a championship meet, XCScore calculates and displays results instantly so athletes, coaches, and fans can follow the race as it unfolds.
How It Works
XCScore is a Windows application that calculates team scores for Cross Country events in real-time, based on the split or results data received from FinishLynx, and sends these scores to scoreboards or video displays connected to ResulTV.
Key Features & Benefits
Real-Time Team Scores XCScore updates team scores dynamically as results or split times are received from FinishLynx giving spectators and coaches an up-to-the-minute leader board.
Display Team Scores on LED Boards XCScore integrates with ResulTV and is the perfect tool to leverage your existing displays to showcase live team scores.
User-Configurable Scoring Logic XCScore offers flexible options to set the number of scoring athletes, displacers, and scoring rules ideal for different event formats or local scoring standards.
Customizable Display Scripts Built-in ResulTV scripts allow for tailored scoreboard output. Modify the included LSS scripts or create your own to fit your event branding and display needs.
Network Connection to FinishLynx XCScore connects directly to FinishLynx over your event network, ensuring seamless data flow from your timing system to your displays.
Windows 11 Compatible Designed for modern systems, XCScore runs smoothly on Windows 11 for optimal performance and future-proofing.
Bring XCScore to Your Next Meet
If you already have FinishLynx and ResulTV, adding XCScore is a game-changer. Contact us to learn more about bringing real-time scoring to your course this season.
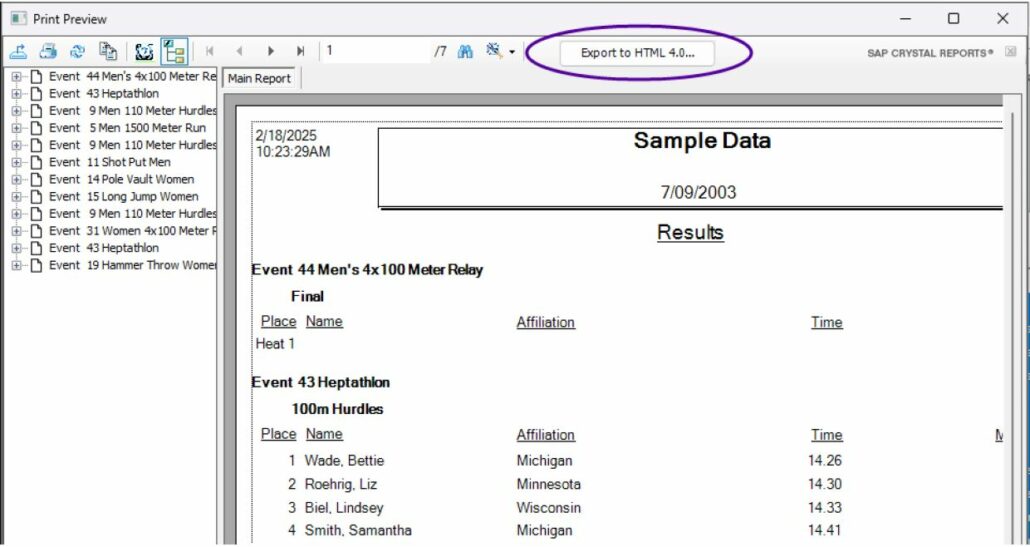
LynxPad can now export reports in Flat HTML format, making it compatible with online results systems such as MileSplit. To export results in Flat HTML:
Go to Reports | Results,
Select the events to be included.
Click Preview.
Click the Save Flat HTML button (above the results preview).
Enter a filename and browse to the desired location.
Click Save.
General Improvements
Fixed issue where male relay members were not saved correctly after initial entry.
Dress Up Your Finish Line for Improved FinishLynx Images
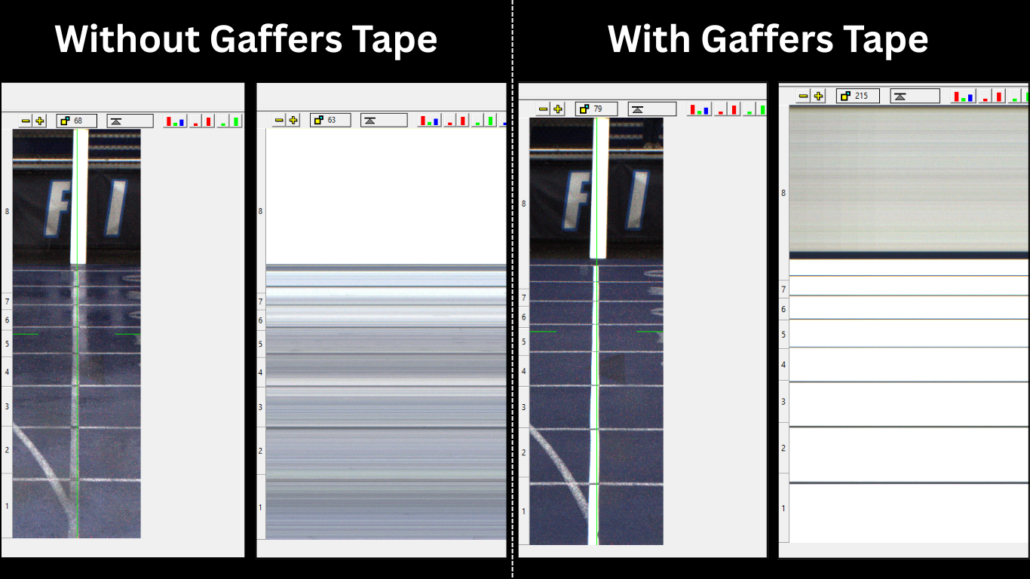
Having a crisp, white finish line is the quickest way to ensure clear FinishLynx captures. It doesn’t matter if your finish line is on a track, along the grass, or across a paved road. Depending on your situation, you can choose to use white gaffers tape (matte, non-glossy), chalk, or even paint (if allowed) to improve your finish line.
When re-painting the finish line is not an option, a very useful tool for timers to have with them is white gaffer tape which can be both a cheap and effective way to drastically improve the FinishLynx image. Even if the finish line at your meet isn’t the worst you’ve seen, making this minor enhancement still offers a big improvement in the quality of your photo-finish images (see example image below). The key thing to remember with gaffer tape is that it’s non-reflective, whereas something shiny like white duct tape may reflect TOO much light at the camera if it is sunny.
Some choose to go a step further and add black tape to the lane lines which is a great way to clearly identify the lanes in your image. If you don’t want to add black tape, another option is to leave a space without gaffer tape between each lane to help differentiate the lanes. Many users will also add a white post/board on the far end of their finish line. This vertical post extends the white finish line vertically to create more uniform image captures.
Important note: It is not recommended to use one continuous strip of tape across the finish line as this can cause a tripping hazard throughout the race if it starts to peel up. Instead, it’s best to tear the tape at each lane or cross-section. Also, remember to remove the tape promptly at the end of your event. If it’s left on for days, especially in the sun, it can damage the surface of the track.
Since gaffers tape comes in various sizes, we recommend using the 2″ tape. Two options for gaffers tape can be found below:
First, replace the Ethernet cables one at a time to eliminate the possibility of a bad cable or a bad connection. If you’re using a multi-port switch, try different connection ports in case there is a loose connection or bad contact.
In FinishLynx, click Camera Settings | Input, set Gun Sensor to None. This turns off the wired start connection. The wired start and wireless start are two separate connections in the system and are independent of each other.
Check that the RadioLynx Wireless Start is configured correctly. Open the: Camera Settings: | RadioLynx: tab and be sure the selected item matches the physical connection of the RadioLynx receiver (C-Box, camera back, radio port etc).
Error Aligning Camera
When the camera has not booted and the operator clicks on the Red Stop Sign in the upper left corner to access alignment mode, FinishLynx will display this error message. It signifies that there is no camera available. Make sure that the camera has booted and the camera information line appears across the top of the FinishLynx screen before attempting to open the Alignment Mode.
Spacebar Toggles Capture
If you see this message but are trying to use Automatic Capture Mode, check the following:
Go to the Camera Settings | Capture tab, check: Automatic: and uncheck: Manual.
Repeat for all cameras loaded.
Go to File | Options | General tab, and next to Capture Button: uncheck: Allow button override.
If you are trying to use a manual capture button, check the following:
Go to File | Options | General tab, and set Capture Button: to the COM port that corresponds with your USB capture button.
Capture Button Serial Port Unavailable
Capture button serial port unavailable; keyboard capture will be used.: This common error message can: appear when starting your FinishLynx software. If you get this message and you’re using: Auto Capture: but: not: the Capture Button, then no further action is required. You can proceed to running your meet as planned.
If you: are: using the Capture Button and receive the message above, click: here: to learn what to do in that instance.
Error 129: Failed Contact Address
Disable Wireless
Open Network and Sharing Center and select Change Adapter Settings.
Right-click Wireless Network and click Disable.
Make sure you are running the correct version of FinishLynx.
To see what version you have, Open FinishLynx then click Help | About,
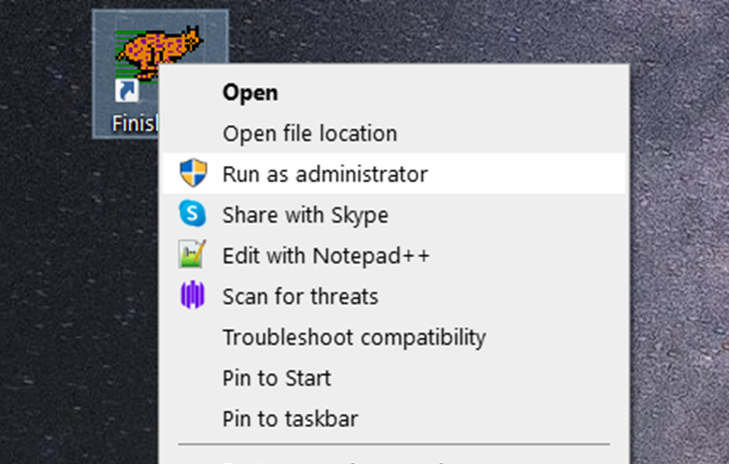
Some versions of windows require added permissions to enable the IdentiLynx camera. To correct the issue of an IdentiLynx not loading, simply close FinishLynx and run the program as administrator by right-clicking and selecting Run as administrator as seen to the right.
If this does not correct your issue, please check that there are no conflicting IP addresses on your network and: contact Lynx technical support: if needed.
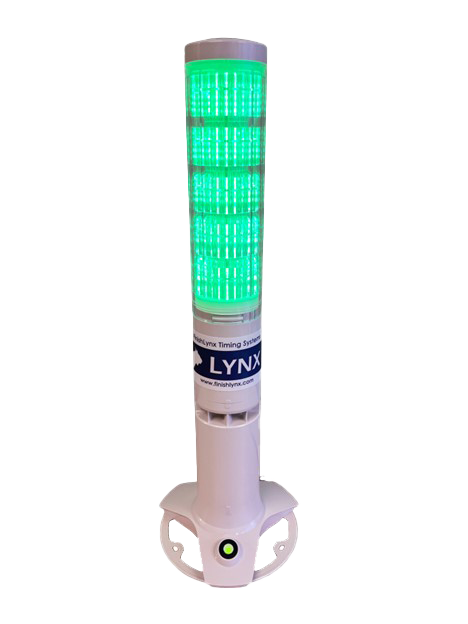
VeriLight brings technology recently showcased at the highest level of competition and makes it available for all. This Ethernet (PoE) device can be managed from VeriLynx, FinishLynx or FieldLynx and serves as a multi-purpose, remote-controlled, indicator light. Are you struggling to find all the officials needed to run an event? Use it with VeriLynx or FieldLynx to flag foot fouls in the Long or Triple Jump. Is communication between the timer and the starter a challenge? Use VeriLight with FinishLynx to inform the starter that the next race is armed and ready for a start.
Pre-defined and customizable scoreboard scripts (LSS files) are provided to quickly become operational. Simply connect VeriLight to your network via PoE and you are ready to go.
Features
Multi-color (5-tier) signal tower
Ethernet connection with PoE support
Free-standing platform
Seamless Integration with VeriLynx, FinishLynx and FieldLynx
Customizable lights and sound via scoreboard script (LSS)
TIP: To preserve your current settings, do not uninstall the old version.
VeriLight Support
VeriLight, an Ethernet (PoE) device, can be managed from VeriLynx, FinishLynx (or FieldLynx) and serves as a multi-purpose, remote-controlled, indicator light. Use it with VeriLynx to show foul/valid attempts or with FinishLynx to show when a race is armed and ready for the next start.
TIP: VeriLight defaults to 192.168.0.99 and listening on port 10000.
To use VeriLight with VeriLynx:
Alt-F (VeriLight | Foul) will toggle VeriLight red/off to indicate a foul.
Alt-V (VeriLight | Valid) will toggle VeriLight green/off.
To use VeriLight with FinishLynx.
To use VeriLight with FinishLynx:
Create a new scoreboard object.
Select VeriLight_Ready.lss
Set the IP Address and Port to 192.168.0.99 and 10000.
Set Running time = Auto
Simply arm the next event for VeriLight to light up green. It will turn off after a start signal is received.
Scoreboard Scripts
VeriLight.lss is added.
VeriLight_Ready.lss is added.
ResulTV_VeriLynx.lss can show valid/foul on ResulTV standard layouts when using the VeriLynx profile.
ResulTV_Video_VeriLynx.lss can show valid/foul on ResulTV video layouts when using the VeriLynx profile.
ResulTV_Video_1line.lss is updated to display the wind in the header row when applicable.
ResulTV_Video_3lines.lss is updated to display the wind in the header row when applicable.
ResulTV_Video_1line-360.lss is a customized ResulTV video layout for the Lynx 360 display.
ResulTV_AutoSwitch.lss simplifies setting up layout switching.
VDMPlaceNameTime.lss is updated to display the wind in the header row when applicable.
Nevco_123.lss is updated.
Nevco_Matrix.lss is added.
Nevco_x6xx.lss is added.
Additional Updates
Language (LNG) File Updates
de_DE.lng
en_VL.lng
White Balance Defaults
When a Vision-Series camera is initially booted it will use updated white balance default values:
Vision (5L500): RGB = 90,0,120
Vision PRO (5L600): RGB = 90,0,60
User Interface Improvements
Internal RadioLynx Frequency selecetion box(Camera Settings | RadioLynx tab) displays the corresponding HiLink value between brackets (e.g. 0001(47) where 47 is the HiLink equivalent of 0001).
Installer Updates
The en_US.lng is no longer overwritten when a new version is installed.
NOTE: Run FinishLynx as Administrator (right-click shortcut + Run As Administrator) for best performance.
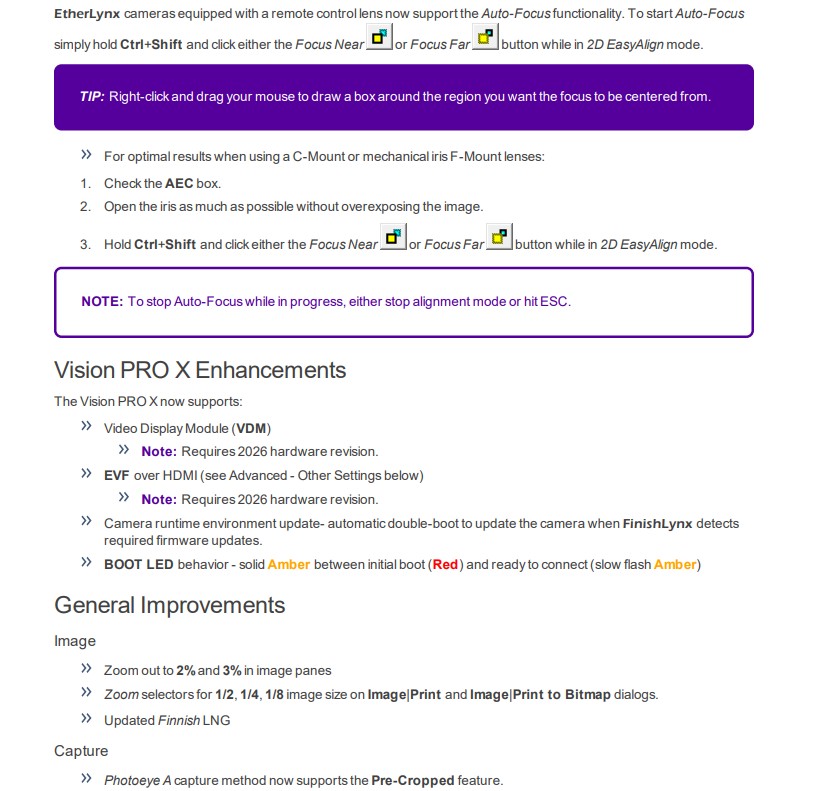
Advanced – Other Settings
Additional Other (hidden) settings are included:
Event\LargeFile now defaults to 15000 (240mb).
Event\WarnCropped now defaults to 0 (disabled).
Scoreboard#\TCPEchoBytes determines if data received from a device are echoed back (legacy/default) or not (value = 0)
All FinishLynx software and plug-ins are developed for the Windows operating system. Therefore, all computers used by FinishLynx operators must be running some version of Windows. FinishLynx is not compatible with Apple, iOS, Android, or Linux operating systems. We don’t recommend you try to port the FinishLynx software to another operating system.
Generally, any Windows-based computer purchased in the last 10+ years should be powerful enough to run FinishLynx, LynxPad, and all other Lynx software. The more RAM and hard drive space it has, the easier it will be to capture large events. See the table below for our minimum and recommended computer specs.
Computer Specification
Minimum
Recommended
Operating System
Windows 98 or later
Windows 10 or later:
Processor Speed
500 MHz
2 GHz Core i7 or higher
RAM
512 MB
8 GB or higher:
Storage:
16 GB: HD
512 GB SSD or higher:
Screen Resolution
800 x 600
1920 x 1080 or higher:
Network Card
10/100 Ethernet
10/100/1000 Ethernet: (RJ45 port)
USB
1
2+
Computer Features
Number Pad Matte Screen
If you require additional technical support, please send an email to support@finishlynx.com or call 978-556-9780.
November 2021 – Taking effect November 1, 2021, World Athletics (WA) Technical Rule 30.1.1 states that horizontal jump take-off failures are re-defined to include any breaking of the vertical plane of the take-off line. In addition, Rule 29.5 strongly encourages judges to use video, or other technology, to assist in the decision process.
As a response, the latest version of FinishLynx (FL 12.00) includes a new profile called VeriLynx. This profile is customized to support the use of IdentiLynx cameras for video review of field events. Read below to find out more about VeriLynx and other updates included in FinishLynx 12.00. The latest version of FinishLynx can be downloaded from our FinishLynx Software page.
Profiles
FinishLynx supports the concept of profiles. A profile can be created and used to store configuration and camera settings, as well as an associated language file or splash screen. When a profile is used, all of the settings are saved to the current profile when FinishLynx is closed, and re-loaded the next time FinishLynx is started. This makes it easy to switch from one application to the next (such as Track to Cross Country and back, for example).
VeriLynx Profile
Field Event Video Verification
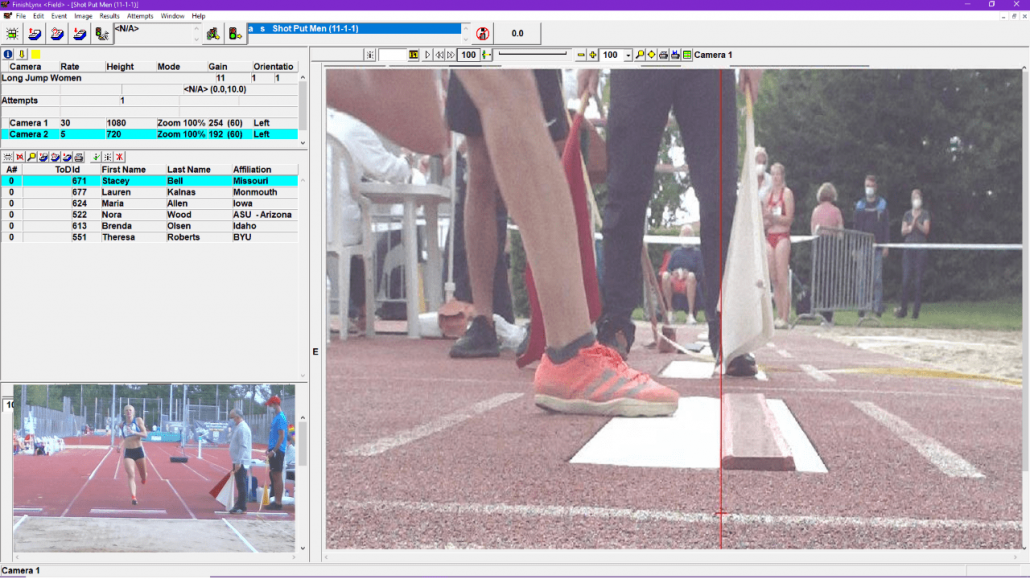
FinishLynx includes the VeriLynx profile. This profile is customized to support the use of IdentiLynx cameras for video review of field events, such as the verification of take-off fouls in the Long or Triple Jump events. Align the IdentiLynx camera with the take-off board, load the field event start list, capture, verify, and timestamp every attempt. VeriLynx will save all images to disk in real-time (no image loss) and allow you to quickly review every attempt for every athlete, providing proof in case of a foul.
VeriLynx also has the option of exporting a JPEG of each attempt automatically when marking a frame, and keeping multiple IdentiLynx image panes synchronized (time tracking) to view multiple angles.
Pre-configured profile available with standard FinishLynx installation giving a customized user interface for field events
Ability to load field events from the field event schedule file (fldlynx.sch)
Ability to view a vertical line in alignment mode for IdentiLynx cameras to facilitate camera alignment with the take-off board (see image above)
Ability to capture and review all attempts from a flight into the same FinishLynx event
Ability to set the ACM active area so it is limited to the image’s vertical area of the take-off board
Ability to mark/log attempts with the time of day to allow quick review of all attempts for each athlete during or after the event
Ability to display the attempt number of each attempt in the Results Zone and on the image using Line Labels
Ability to automatically export an image (jpg) when an attempt is marked/logged
Ability to time track (scrolling through an image of one camera refreshes the other image panes with the equivalent frame) between images of multiple cameras to easily review different angles, including the option of using a front-facing camera to identify the athlete
LapTime & Scoreboard Status
LapTime objects now show the connection status in the Status bar.
In addition to existing states (not loaded, not running, running), the Status in the object box for the LapTime and Scoreboard Options tabs can now show Not Connected if the TCP connections are not connected, but otherwise loaded and configured.
Additionally, there have been updates made to scoreboard scripts, Remote Control Commands, and the Lynx Data Port (LDP) Plug-in, plus Advanced Other Settings.
For many Lynx users, timing is a seasonal job that comes and goes. Some of our service providers are busy timing events year-round, but we know that many others, including high school and college customers, put their systems in storage between seasons. Because of this, we want to share some resources that will help get your FinishLynx system and operators working as efficiently as possible. Lynx offers an array of online tools that can benefit the novice to the pro timer.
FinishLynx Sports Timers Facebook Group
The FinishLynx Sports Timers Facebook group was started in the hopes of giving FinishLynx operators a space to network and share their questions and timing photos. Over the years, it has grown to over 1,400 active members who post regularly. We love seeing the community grow and engage with one another to help solve problems and brag about their timing setups. When you join, be sure to introduce yourself and let others see your best “Office of the Day” photo!
The Tech Support team here at Lynx has been working hard over the years to provide FinishLynx operators with helpful video content to aid in system setup and operation. To help find what you’re looking for, click on the ‘Playlists’ tab to see videos broken down into categories. Some of the popular playlists include Video Release Notes, New User FinishLynx Timing System Setup, and Advanced Operation of FinishLynx. Be sure to also subscribe to the Lynx YouTube channel to be notified when new videos are added.
Online Help Manual
This online support tool was created to act as a searchable FinishLynx Operator’s Manual combined with years of software release notes. Support videos have been integrated into the relevant sections for added clarity, and other features include the ability to print a page that’s particularly helpful, search hundreds of informational pages at once for exactly what you’re looking for, and use it across all devices as it’s also mobile-friendly. This resource is updated with each new software release or new features/products.
Benefits of the new online operator’s manual:
Up-to-Date: It will constantly be updated with the latest release notes, technology, and software information unlike the current PDF version of the FinishLynx manual which is a few years old at this point.
Searchable: The key feature of this user manual is that it’s a search engine of sorts for FinishLynx information. You’ll no longer need to look through page after page for the answers you’re trying to find.
Mobile-Friendly: Have a question during your meet? Pull up the Online Help Manual to quickly find your solution. Use this resource across all of your devices.
Product Quick-Start Guides (QSGs) are designed to provide simple, step-by-step directions for setting up your FinishLynx timing system. These setup guides are included with every product and system we ship. But you can also view and download them at any time. The guides vary by sport, competition level, and product,so be sure to select the QSG that best fits your system.
Visit the File Library for a full list of product manuals, release notes, quick-start guides (QSGs), and other support documents that may be useful to FinishLynx operators. You will also find direct download links for various software and firmware applications.
Since the release of the wave start feature in FinishLynx when using the Time Trial mode, we have received a few questions for which the answers could serve many users. Here are some advanced tips for wave starts.
How do I stop FinishLynx from switching the running time to the next start after I evaluate a result?
The default configuration has an auto-advance feature to simplify operations in a traditional trial. To disable (or customize) this behavior:
Hold Ctrl+Shift and go to File|Options…
The Other Settings dialog opens.
Expand Event.
Expand Starts.
Select TTAdvance.
Set the value to 0 (disabled).
How do I avoid having the cumulative split time change to time of day when evaluating the finish from the image?
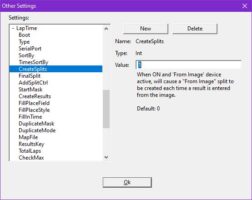
When a laptime device is used in Time Trial mode and a time is evaluated from the image, FinishLynx needs to know explicitly that this should also be considered a From Image split. The easiest solution is to enable the CreateSplits function.
Hold Ctrl+Shift and go to File|Options…
The Other Settings dialog opens.
Expand LapTime.
Select CreateSplit.
Set the value to 1 (ON).
How do I enable the start mask so it is applied to all waves (not just the first)?
By default, FinishLynx will assign laptime events to all participants as soon as one start exists. If the participant’s start key value does not exist when a laptime event is received, it will fall back to the first available start to establish a time.
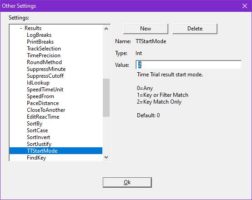
For the start mask to be applied, the TTStartMode must be set to Key Field only.
Hold Ctrl+Shift and go to File|Options…
The Other Settings dialog opens.
Expand Event.
Expand Results.
Select TTStartMode.
Set the value to 2 (key field only).
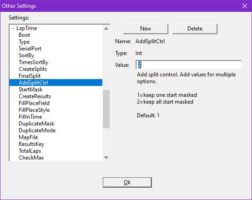
In such a case, FinishLynx will not find an associated start time and simply create a results line without laptime data in the Results Zone. By default, the first laptime event received in such a case is marked as deleted by remains available in the Edit Split, dialog. To save all received laptime events as deleted, modify the AddSplitCtrl option.