Optimize Captures By Taking Full Advantage of the Smaller Image Sensor
Optimize Vision PRO Captures
The EtherLynx Vision-series cameras (Vision and Vision PRO) offer many new features and functions that were previously unavailable with older generation cameras. Of these, EasyAlign and Power-Over-Ethernet are favorites among FinishLynx timers. Just as well, these photo-finish cameras use the latest, most advanced image sensors on the market that allow frame rates never previously imaginable (up to 20,000 fps) as well as setting new benchmarks for light sensitivity.
Another major difference with these new image sensors is their size. For example, the sensor in the Vision PRO is about 27% of the size of the sensor in the old EtherLynx PRO.
The objective of this post is to demonstrate how to leverage this difference to capture better photo-finish images with the EtherLynx Vision PRO camera.
Advantages
The main advantage of using a smaller sensor is that it requires a smaller lens to cover the same view. When a 200mm lens was previously required on an EtherLynx PRO, the Vision PRO will display the same content with only a 55mm lens.
This advantage is compounded by the fact that a smaller lens can be:
- More light sensitive
- Remote controlled
- Less expensive
Example
| EtherLynx PRO | Vision PRO | |
| Required Focal Length | 200mm | 55mm |
| Common Lens | Nikon 80-200mm | Computar 12.5-75mm |
| Lens Light Sensitivity | f2.8 | f1.2 (offers 4.5x more light) |
| Lens Cost | $1,410 USD | $800 USD |
| Remote Functions | Iris only | Zoom, Focus, Iris |
Combined with higher available frame rates and improved light sensitivityas well as tools like LuxBoost and the Double functionVision PRO users are able to maximize the time resolution of captured images and easily split the difference of close finishes. When it comes to photo-finish, this is the name of the game.
Challenges
The advantage stated above becomes a challenge when the camera is set up close to the finish line and a wide angled lens is required. A good example of this is in cycling, when the camera is usually mounted on the gantry and a 24mm lens on an EtherLynx PRO is standard.
In such a case, the solution is to use the Computar 2.8-10mm f1.2 (P-Iris) lens.
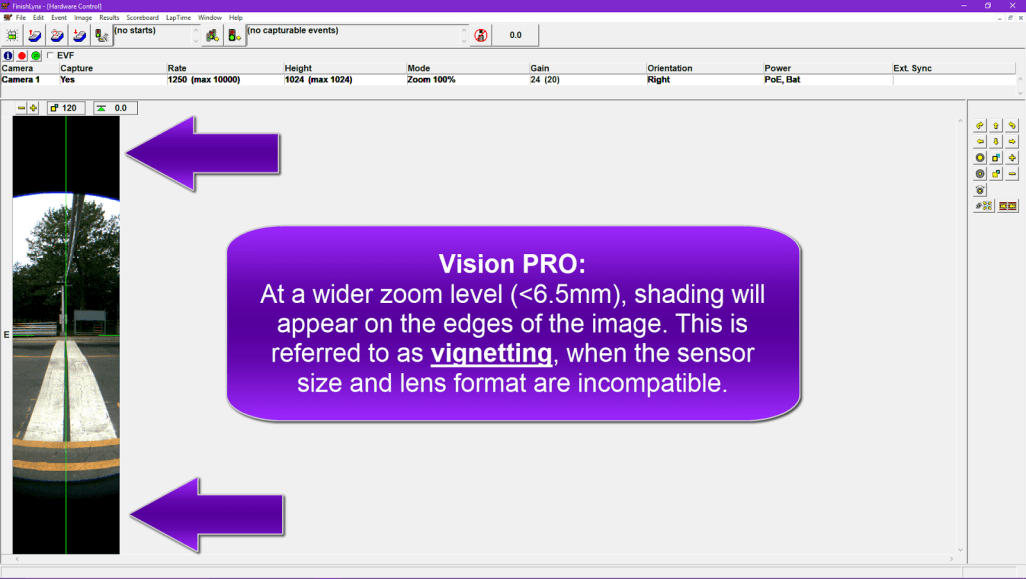
Vignetting
The Computar 2.8-10mm f1.2 (P-Iris) lens allows full resolution with Vision PRO cameras between ~6.5-10mm only. At a wider zoom level (<6.5mm), shading will appear on the edges of the image. This is referred to as vignetting, when the sensor size and lens format are incompatible.
NOTE: A 6.5mm lens on a Vision PRO is the equivalent of a 24mm lens on an EtherLynx PRO.
Video Tutorial: Set the Iris Type and Prevent Vignetting on Vision Cameras
Optimizing Vision PRO Image Quality & Time Resolution
Optimal image quality is obtained by maximizing the resolution of the objects of interest that are captured. A higher resolution means more details in the image and, in turn, a better chance of differentiating close finishes.
Key Steps
1. Select the Correct Lens
Because the smaller sensor requires a smaller lens, it should always be possible to use a lens with a focal length adequate for the camera position.
To calculate the right lens for your setup and application, download the Lens Focal Length & Frame Rate Calculator (LensCalc.xls). You can enter the different distance parameters to calculate the correct focal length (left), or simply select the current camera and lens to find the equivalent for the Vision PRO (right).
Detailed steps are described on the Lens & Mounts page of the FinishLynx Online Manual.
2. Use the Full Height of the Image Sensor
Avoid capturing dead space at the top or bottom of the image by zooming in as much as possible. The more you zoom in, without cutting off important parts, the higher the resolution of the captured object.
With previous cameras, this was often impossible because bigger, expensive, telephoto lenses were needed.
3. Use Digital Zoom to Boost the Resolution (Optional)
Start by setting the Pixel Mode to Zoom 200%. Then, double the Frame Height (2048 pixels) and the Frame Rate to maintain the same ratio. You will produce images that have 4 times the resolution of an image taken at Zoom 100% (2 in the vertical dimension X 2 in the horizontal dimension).
Video Tutorial: Optimize Image Quality & Settings on the Vision PRO Camera
Low-Light Tips
Of course, doubling the frame rate requires double the amount of light. In low-light environments, try clicking the Double checkbox in the Camera Settings to offset this requirement.
To further push the limits of Vision PRO cameras in low-light conditions, LuxBoost is a great tool. To keep images crisp when LuxBoost is used, ensure that the frame rate matches the speed of the objects being captured. At high LuxBoost values, a discrepancy may lead to increased image softness.
We hope these best practices will help to produce some beautiful race images and be sure to share your best ones with us: online! Contact tech support with any questions. : Learn more about the Vision PRO camera here: www.finishlynx.com/product/cameras/etherlynx-vision-pro/