12 Tips to Help you Prepare for Another Season of Flawless Results
For many Lynx users, timing is a seasonal job that comes and goes with the fall, winter, and spring. Some of our service providers are busy timing events year-round. But we know that many others, including high school and college customers, put their systems in storage all winter. If your FinishLynx system has been hibernating all winter, we suggest you look through the pre-season checklist below. It’s a great way to make sure your cameras, cables, and connectors are ready for the spring season. Performing these twelve steps will help you identify and prevent any unwanted surprises during your first meet of the year.
1. Perform a visual equipment check
Gather all the FinishLynx equipment, cables, and any other additional equipment added to the system. Do a relatively thorough inventory of all equipment and cables. Visually check that there is no obvious damage, rust, or corrosion to equipment and cables. If you don’t already have them, it is always beneficial to have spare network cables, serial cable, null modem cable, gender-changers and a 4- or 8-port switch.
2. Update your FinishLynx software to latest version
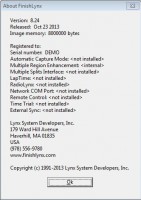
Open the FinishLynx software on your computer and go to Help | About. Verify that the latest version of FinishLynx is installed. As of October 2017, the latest version of FinishLynx is 10.03. Be sure that any other computers also have the latest version of FinishLynx installed. The latest software is available for free and can always be found on the FinishLynx software page under the downloads tab.
3. Verify that any software plug-ins are installed and up-to-date
If you own the LapTime, TimeTrial, or any other FinishLynx plug-ins, you may want to ensure that you have the latest versions. These plug-ins tend to have new devices or features added from time-to-time. The latest version of these plug-ins can be found on our website under the “Software Plugins” page. Please note that FinishLynx plug-ins must be purchased and require a serial number.
To verify that a plug-in is installed properly, open the FinishLynx software and go to Help | About. If there is a serial number displayed next to the plug-in, then that means it’s installed and should be working properly. But as with everything else, we recommend you test it just to be sure. If it says <not installed> then this could be due to a serial number entered incorrectly or because the plug-in was never installed. Verify your plug-ins on all computers that may be used with FinishLynx during the season. If you believe you purchased a plug-in but don’t have the serial number, please contact our customer support team for assistance.
4. Boot camera
Before you open FinishLynx and boot the camera, perform the following 3 steps:
- Set the static IP (192.168.0.5)
- Turn off the Firewall
- Disable the wireless card
It is best to start with a minimal number of connections so as not to complicate the process. A cross-over cable is a good option to boot the camera because you can connect directly from the camera to the computer and limit the potential failure points. When booting the camera, it is always helpful to observe the lights on the back of the camera in case there is trouble booting. If you are having trouble booting the camera, see the short troubleshoot guide later in this post.
5. Test network connections
Once the camera has booted with FinishLynx, let the camera run for a while just to make sure the connections are working properly. Next, begin to test all network cables. Reboot the camera multiple times as you change the connections from the Connection Box and network Switch (not a router). Replace one network cable at a time so any bad cables can be identified and eliminated. Some network cables may simply need an end (RJ45) replaced. This is a good skill to have – you can view a how-to guide here.
6. Test remote features inside the software
Remote C-mount Lens: Once the camera is up and running, align the camera sensor on a mock finish line (if possible) and test the remote features. In the hardware control window, test the full parameters of the Zoom, Focus, and Iris. The tiny motors are incremental and in order to move the full range of the lens function, the icon must be clicked and held for about 1 second and repeated 4 or 5 times.
F-mount lens with remote iris: Once the camera is up and running, align the camera sensor on a mock finish line if possible and test the remote iris.
Remote Positioner: In the hardware control window, test the full parameters of the Tilt, Pan, and Swivel. The motors will move the Positioner full range if the icon is held on. Watch the Positioner movement carefully because holding it down too long can burn the motors out. Once the individual functions have been tested, test the Center Positioner function. If you want to test the Auto-Align function, a white finish line will need to be used.
7. Test gun starts
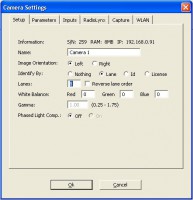
Wired Start: Once the FinishLynx system is up and running, plug the 500-foot reel of gray gun cable into the Start connection on the Connection Box. Open Camera Settings from the blue circle with white “i” and click on the Inputs tab. Closed should be selected for Sensor. Close Camera Settings, open a blank event in FinishLynx, and tap the gun sensor to get a start to the event.
Wireless Start: Once the FinishLynx system is up and running, plug the RadioLynx receiver (DecRadio) in the Serial connection on the Connection Box and the red banana plug into the 12vdcOUT + port. The Pro (5L300), Fusion (5L400) and new Etherlynx 2000+ (5L401) will plug the DecRadio into the serial port on the back of the camera.
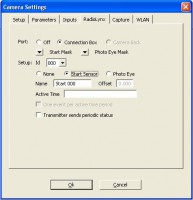
Open Camera Settings from the blue circle with white “i” and click on the RadioLynx tab. Connection Box should be selected for Port; Setup ID should be 000; Start Sensor should be selected and Name should read Start 000. The Pro, Fusion and EtherLynx 2000+ will choose Camera Back for Port. Close Camera Settings, open a blank event in FinishLynx, turn on the RadioLynx transmitter (EncRadio) and watch the boot process for CHA; 000; -L-; typ; STA. Once booted, tap the gun sensor to get a start to the event. The transmitter should beep also. If you are having trouble with the wireless start, see the short troubleshoot guide.
8. Test USB adapters and ports on laptop
Open the FinishLynx software on your computer and go to File | Options | General. Click the drop-down for Capture Button and look at the list of connection options. It will probably list Keyboard, COM 1 and COM 3, but this varies with computers. Next, close the FinishLynx software, plug the USB adapter into a USB port, and open the FinishLynx software. There should be a new COM port listed under Capture Button (typically COM 4 or higher). Repeat this process for all USB ports.
If you want to be more computer savvy, go to Start | Control Panel | System and find Device Manager. Plug the USB adapter into a USB port and watch the listing for ports and it should list the brand of adapter and the port assigned. Repeat this for each USB port. Watch for any warning symbols that may appear signifying a problem with the device. If you recently upgraded to Windows 7 or Windows 8, we recommend you install the latest device drivers. They can be found in this post.
9. Test network sharing with meet management software
- Create a new directory on the computer for the upcoming season and put it in the master directory or share the new directory on the Windows Network. When sharing the directory, make sure that everyone has full rights to read, write and change files.
- Repeat this process on the Meet Management computer also. Open FinishLynx and select File | Options | Event. Click on the Browse button for Event Directory and point the location to your new directory.
- Next, click on the Database tab under Options and then click on the Browse button for Input Directory and this time point it to the shared directory on the Meet Management computer. Copy and paste this path into the Output Directory also.
Note: If you are doing everything on a single computer, then Event Directory, Input Directory and Output Directory will all be the same. Create a test competition in the Meet Management software. In FinishLynx, test loading the schedule, loading an event, and saving results to the Meet Management directory.
10. Test Serial Cables
Serial connections will typically be to a USB-to-Serial Adapter or the Serial port in the Connection Box. Since you should have tested the USB ports and adapters in Step 7, the rest is testing the connections to the serial devices (scoreboard, wind gauge, etc).
- Set the Capture button to an available COM port and test the Manual Capture.
- Go to File | Options and set up a Scoreboard and Wind Gauge (if possible) and choose an available port for their connection. Remember to close FinishLynx and restart to initialize the setup.
- Send Time of Day and results to the scoreboard and verify the settings are correct and data is displayed.
- Verify that the gun start activates the Wind Gauge and that data is sent back to FinishLynx. It is best if you test these devices while plugged into AC power to avoid the frustration of a low battery.
NOTE: Earlier testing is always better. Don’t wait until the day of your first meet to start testing!
Please do a quick troubleshoot check with the items listed below and then contact tech support if you are still not having success.
11. View Lynx System Setup & Support Videos
Lynx has dozens of technical support videos available on our video support page. Learn more about setting up packages, navigating the FinishLynx software interface, display and scoreboard integration, and other product help. You can also subscribe to our YouTube channel to stay up-to-date on our latest videos.
12. Visit the FinishLynx Online User’s Manual
In the spring of 2017, we launched a searchable online user’s manual for the FinishLynx photo-finish software. This online help manual combines years of release notes and software updates into single, searchable guide. Click here to learn more about the FinishLynx Online Help Manual.
Troubleshooting Tips
Camera Booting Troubleshoot
- Hardware type is set to Detect
- Check static IP 192.168.0.5
- Disable wireless card
- Turn off Firewall
- Turn off any anti-virus programs
- Connect camera directly to computer with a cross-over cable
- Test camera with another computer
- If all else fails, contact tech support
Wireless Start Troubleshoot
- Check that the dipswitches match on both units
- Check the boot settings on the EncRadio
- Check the Camera Settings
- Check the voltage in 12vDC out (11+ volts)
- Delete lynx.cdf in Lynx directory, open FinishLynx software and apply new Camera Settings for RadioLynx
- Connect C-Box and C-box cable to a 2nd timer enabled camera and test
- If all else fails, contact tech support


